Showing posts with label custom. Show all posts

Monday 16 December 2013

New Vintage

Thanks to the fine reporters over at Jedinews.co.uk I spent a good hour last night scrolling through Matt Cauley's Iron Cow Productions site, checking out his line of custom Star Wars vintage figures. There are some ingenious designs and ideas in there, along with some great studio style photography, but the real selling point is how much, for the most part, these look like figures that Kenner might have produced back in the 80s.

Luke Skywalker (Ceremonial Outfit)
There are a few photos up for each figure, along with a description of the different parts and methods used to build the custom. Some of them are deceptively simple, even utilising as little as a headswap to create a new character, whilst others are a bit more advanced...

4-Arms (Nabrun Leids)
One thing that I like is the way that Matt has used certain pieces from modern figures, be it POTF2 pauldrons and backpacks for Sandtroopers, a few head sculpts, and even the whole upper body, as is the case with 4-Arms (above). It's amazing how well the different styles go together, but I think that's got just as much to do with his commitment to a vintage aesthetic as it does the original sculpts. 

Spirit of Obi-Wan Kenobi
Vintage customs have been around for a while, but it's rare to see them at such a high standard and presented as well as these figures are. There's a whole host of other customs on the Iron-Cow Productions site, along with tutorials on customising basics (which look to be incredibly useful for an amateur like me), so be sure to check it out, and let me know if it inspires you to make any new vintage yourself!

Friday 18 October 2013

The Purge: Part Three of the Exciting Trilogy!


OK! It's the final post on this weeks batch of figures for sale. As of typing this everything but the Action Fleet Landspeeder has a bid on it, so barring a mass buyer pull out these figures are already as good as gone. Without any further ado then, let's give these guys a decent appropriate send off!

No Good Words.
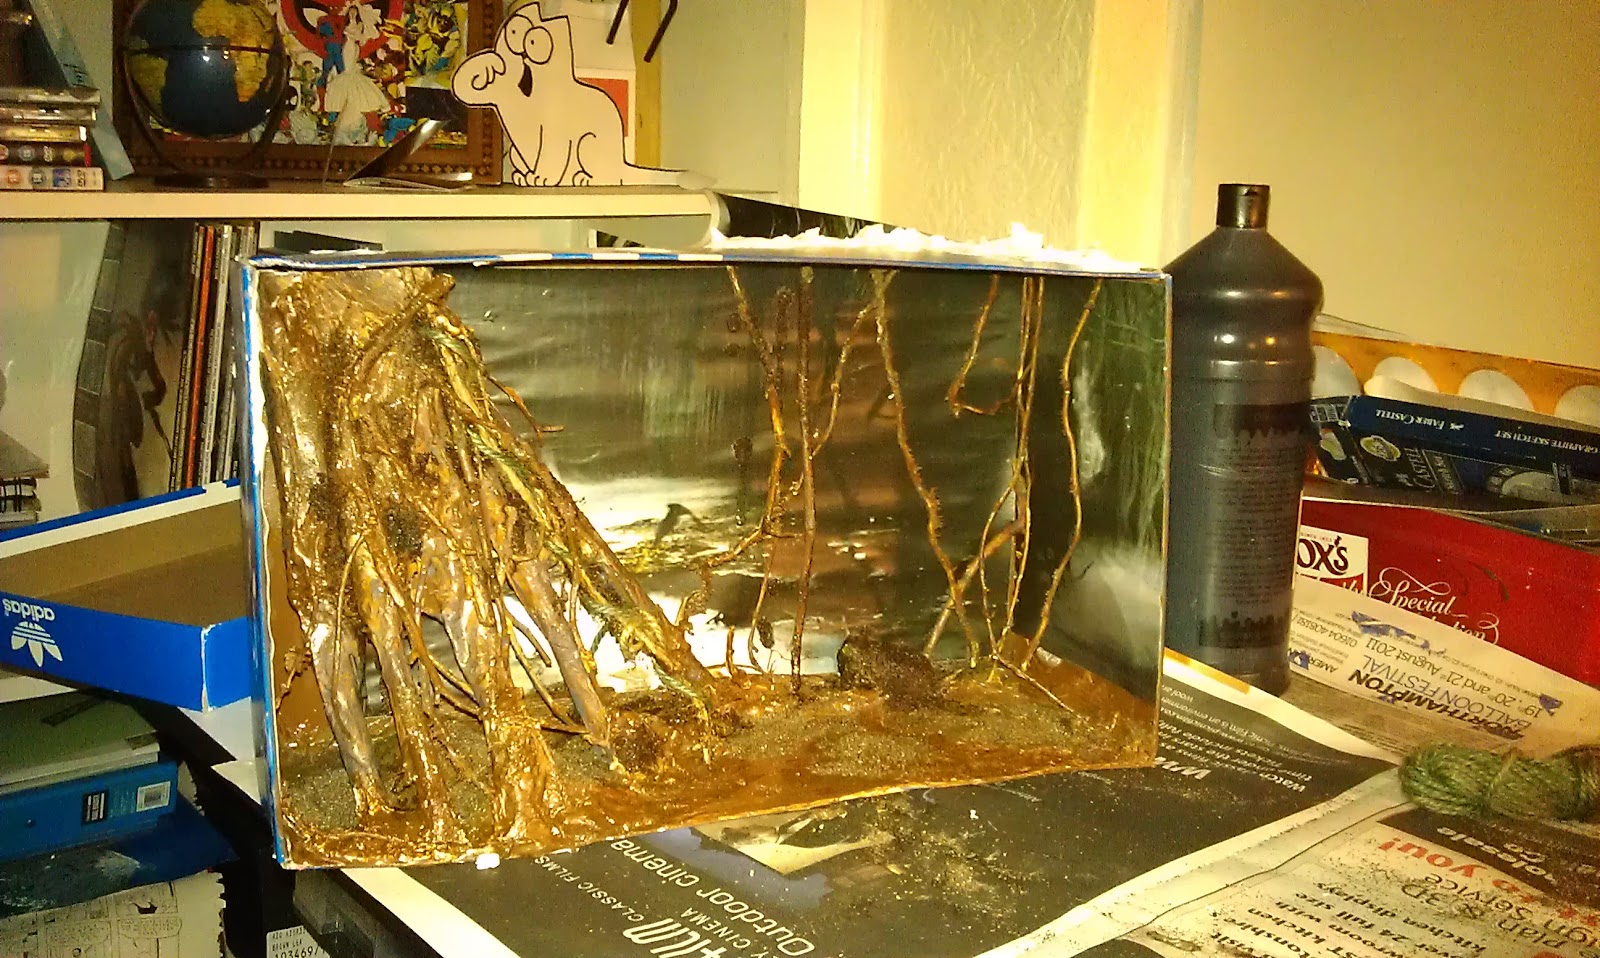
You know the thing about this Yoda toy, from the Vintage Collection? It's a very good action figure, a good likeness of the Prequel character it's based on, and aside from the pea-green hair, fairly flawless. The problem though, is that it's based on Prequel Yoda. The lightsaber wielding, fight happy, non-sensical little CG-goon that killed ESB's mystery and went on to whore himself out to Vodafone. He really is nothing like the wise little Jedi Master so many of us were enthralled with for nearly two decades. Anyway, something struck me when watching ROTS the other day - AOTC is awful, obviously, and Yoda's Sonic the Hedgehog impression goes some way to furthering that impression. Now, imagine if we never saw Yoda as anything more than the vulnerable muppet he truly is through Episodes I and II, actually living by the mantra that 'wars not make one great' - how much more of an impact would the Order 66 Kashyyyk scene in ROTS have had then?

That right there is the meaning of restraint, George.

Bad Dad.
On the subject of ROTS, here's Anakin Skywalker from the 2005 toy line. He comes with a blue lightsaber wielding right hand, an interchangeable open right hand, and Count Dooku's red lightsaber for some left-handed decapitating action. He also has the 'squeeze my legs and I slash' action feature as practised by incontinents and Obi-Wan Kenobi toys everywhere. It's a decent likeness that has served me well enough for the last few years, but the new Saga Legends Anakin has now rendered this completely obsolete.

Redeemed Dad!
Speaking of obsolete, here's the Vintage Collection Darth Vader that's also up for grabs, and currently subject of a fierce bidding war. I have 2007's Anniversary Collection Vader, with a one-piece removable helmet that can actually stay on, and also without that ridiculous silver chain around this guy's neck. Sith bling. He can also hold his lightsaber in his (correct) right hand. Whilst the two part helmet of the VC figure looks neat, it's absolutely rubbish even as a display piece because it falls off so frequently and doesn't even fit together properly when it's on. How people can swoon over this and have an unbridled hatred for the recent Mission Series Vader, I have no idea. Well, actually I do. It's called idiocy.

Keeping up with all of them.
I'm selling this group of Indiana Jones figures as one lot, because I now have one quality Raiders-style Indy and a playset section to display him on, and don't really feel the need for anything else to display my fondness for Dr. Jones. I was considering keeping at least one of the KOTCS Indys, but decided against it for reasons I will outline below...

*

You know a 3.75" figure that I've always wanted?


Rick O'Connell from the Mummy films. Sure, the sequels sucked fairly massively, but for one exciting film we had a genuine 90's take on the Indiana Jones archetype, and it was awesome. Maybe the fact that I'm willing to give the Scorpion King a pass as a decent film betrays my status as a fan, but whatever. That's why we write these blogs, isn't it?

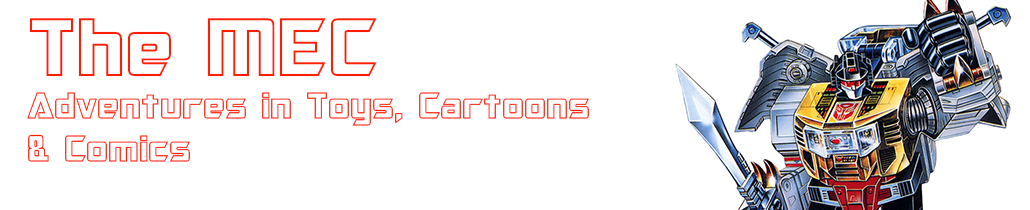
Anyway, I'd planned to use one of the jacketless Indianas from the lot above, along with parts from the Prince Dastan I highlighted on Wednesday to build an O'Connell figure, but I just kept the figures in a box for months without doing anything with them. I've repainted a figure before, but never properly customised one, and I realised when I saw these figures sitting in their box that I never really had any intention to. I struggle to build dioramas, something I profess to enjoy, and the fact that I wouldn't know where to start with a custom is about all I need to put me off.

I guess the short of it is that if a company ever made a 3.75" (or 6", I'm not fussy) Mummy line, with Rick being joined by Evy, Beni, and John Hana, then I'd give them my money. But do it myself?

Nah.

Thanks for enduring my ramblings reading!

Friday 10 August 2012

Building the Box: Two


Welcome to Part Two of my how-to guide to building the Dagobah Box! Part One is here if you want to get caught up, otherwise, let’s get going!


Before properly fixing the tree into place, I needed to decide upon a background. I’d originally wanted to paint my own background, and did a quick mock up with pastels, but wasn’t really happy with the effect. I also tried a print out of a dark, Dagobah swamp-esque image, but the colours and scale didn’t really match. After trial and error with these images, I eventually settled on the image from the film (and the OTC box-art), showing Luke’s partially sunken X-Wing in the distance. 

Pen & Pastel Backdrop
Generic Swamp Backdrop
I dry-brushed the floor of the box with dark green acrylic paint to to help achieve the swamp effect, and then added more branches to the tree, twisting some regular garden twine around the branches to form vines, and covered it in moulding plaster to add texture and hold it all together. When this was complete I spray painted it brown again, dry brushed it dark green, and fixed it properly into place.

It's come a long way from being a toilet roll tube...
Whilst the spray paint is absolutely the best tool to work with for diorama building (I’m converted!), the gloss left quite a singular, damp look to the floor. To add texture I bought some modelling flock (autumn leaves, if I remember correctly), and used PVA glue to apply it to certain areas of the floor and tree.

Pre-flock...
Almost finished. I cut some holes in the top of the box and poked through some vines from my garden on the opposite side of the tree, and used more modelling clay to add texture. I once again used a base layer of dark brown acrylic paint, dry brushed with dark green, and it was done!

...And finished!
And so, I’ve had it for some time – what do I think of the Box as a set for photography, or as a display piece now? What would I do differently? Well, thank you for asking… :D


As a set, the box has worked well for pictures, but also pretty much served its purpose. As it’s such a small scene, and I can only really photograph in one direction, there isn’t too much more I can do with it. The sides and roof of the box are essential in creating the mood of Dagobah, but unfortunately they limit the lighting options – all I can really do is flood the front with light, whilst trying to avoid too much reflection from the background image.


As a display piece, the box is a bit of a mess. Whilst the scene is suitable, the cardboard box warped as soon as I applied the papier mache, and the shape has become further distorted through applications of paint and wet plaster. I’ve had it sat out on my display shelf before, and as happy as I am with the scene, the presentation looks amateurish. I will absolutely use wood or polystyrene for future displays.

Aside from the materials, I was disappointed with myself for not putting the effort in to paint a custom backdrop. The location of the X-Wing in the background messes up the screen accuracy of the scene, and if you follow the lake from the background it should actually flow right into the box itself! Those two points aside though, I don't think it works that badly.


The most important thing I’ve learned from building the Dagobah Box is that a scene or diorama needs to have a specific purpose from the beginning – be it for screen accuracy, display, play or whatever. I made a lot of choices on the fly whilst making this, and the overall look has suffered. I’ve since made a generic display piece, and having made it for a definite purpose, the final effect is much better. If, and when, I embark on a Dagobah scene again, I fully intend to make it scene specific, use appropriate materials, and hopefully end up with a more satisfactory end result.

Sunday 5 August 2012

Building the Box: One


The Dagobah Box is the most ambitious set-piece I’ve made so far; and whilst I’ve thought of many ways to make it better (or to improve version two…) since finishing it, it still works great as a display piece for my Dagobah-themed figures. Here, long overdue for both the Box and this blog, I present a making-off guide, with plenty of WIP shots!

Calvin & Hobbes: Essential reading for everyone.
First of all I found an ordinary shoebox, as inspired by Calvin’s diorama school project. The first challenge for me was to decide which part of Dagobah I wanted to show. The box wasn’t big enough for my POTF2 X-Wing, so I ruled out doing the crash site. I considered making Yoda’s hut, but the box dimensions would have made it really squashed, so that was scratched also. I knew I would primarily be using the set to display the OTC Dagobah wave figures, and so, following a lot of research (by which I mean the hardship of watching Empire Strikes Back :D), I decided on the clearing where Luke has the vision of Cloud City.


I made the tree by selecting several suitable branches from my garden, and chopping them down to the right size. I used a toilet tissue roll as the main trunk of the tree, and then positioned the branches as the roots, holding them in place with masking tape.


Using off-cuts of card and branches to add texture to the ground, I then covered the floor of the box and the tree with papier mache, to unify all the different elements and create a base texture. After letting the glue dry, I checked the scale against the box’s soon-to-be residents…


I used a glossy brown spray paint to completely coat the inside of the box and the tree. Using spray paint was far superior to anything I would’ve done with acrylics and a brush, as the coating was so much more complete and even, as well as quicker to do. I felt at this point however that the box was too sparse, and needed more texture. To achieve this I took several smaller branches from my garden and put them around the floor, as logs and other swamp detritus. I also toyed with the idea of putting a second tree in on the other side of the box, but decided that I might still need the space.


I covered the floor and the tree in moulding plaster, marking it with my fingers as it dried, and used it to good effect on the tree to pull all the different elements together. I also added more twigs and branches to the tree at this point, to create a denser look. With one more coat of spray paint, the scene was beginning to take shape…


Click through here for Part Two, where I complete the set and look at what went right, went wrong, and how I’d do it differently next time!

Monday 2 July 2012

Vintage Pick-Me-Up

In a first for this blog (and indeed, my life), I present a Mos Espa custom... The repainted vintage Luke Skywalker X-Wing Pilot figure!

I picked him up cheap in a pretty worn condition with the intention of doing a repaint, after seeing some pretty good repaints online, but as always with these things took a while to get around to it...


This is the original. The colours are nice, but the paint job was badly chipped, and I wanted to dirty it up a bit and improve the accuracy. For one I really wasn't sure if Kenner had given him a black helmet visor or black hair. Confusing either way... Anyway, it's not perfect, but I'm happy with it for a first go.

Things I like:

- Getting a more accurate colour scheme, like the brown belt and the buttons on the control box
- Going for blonde hair!
- Attaching the lightsaber hilt from my RotS Anakin - literally his father's lightsaber
- I now have my own Dagobah landing Luke, without having to pay in excess of £30!

What I learned:

- I went too heavy on the drybrushing
- The flightsuit looks more red than orange. It's not as bad in person, but the shade isn't right

All in all, it was a fun little project, and something that I will probably attempt again, should the right figure come along...

You may like...

Related Posts Plugin for WordPress, Blogger...